Dave, haven't had a reason to upgrade injectors yet. My a/f is also safe and streetable, not a race tune. At WOT it dips around 11.5 ~ 11.8. When I get a bigger blower I'll need bigger injectors, fuel rails, and fuel supply line. Till then I'm ok.
Chris, yes my fuel pressure goes up under boost. 39 PSI base + 1 PSI per lb of boost. I've data logged some very high spikes too. I have a returnless fuel system so no FMU but rather the tune controls fuel pressure. I did a lot of work to the fuel system actually. I use two Ford GT fuel pumps (as in the Ford GT super car) in parallel through a special custom fuel hat that houses the pumps and slides into the fuel tank. I then wired a second FPDM (fuel pump driver module) in parallel to the first one because these pumps draw so much current a single FPDM can't power both pumps under WOT.
I wired the feed from the computer to both FPDMs and then I wired a signal return from only one of the FPDMs to feed back an accurate signal about pump duty cycle back to the computer. Technically one of my FPDMs could fail (the one not feeding back a signal) and I'd have a drop in fuel pressure and no codes because the computer would still be getting feed back from the good FPDM.
And the 331 project finally begins...
Moderator: MalcolmV8
-
MalcolmV8

- Supporting Member
- Posts: 2597
- Joined: Fri Dec 10, 2004 4:50 pm
- SM: Yes
- Location: Kansas City, MO
Re: And the 331 project finally begins...
92 302 Ranger - sold
94 302 Ranger AWD - sold
07 BMW 335xi - tuned, boost turned up, E85 - sold
04 911 TT - to many mods to list. Over 600 All Wheel HP on pump gas - sold
2015 Coyote - daily driver
03 Cobra - 2.3 TVS on a built 12:1 CR motor with ported heads, cams, long tubes etc.
MD Racing Lean Protection Module
E85
Tuned by MD Racing
https://www.youtube.com/c/MalcolmV8
-
cgrey8
- Supporting Member
- Posts: 4055
- Joined: Fri Dec 10, 2004 8:23 pm
- SM: No
- Location: Acworth, Ga (Metro Atlanta)
- Contact:
Re: And the 331 project finally begins...
This weekend, I was messing around with something unrelated and decided while I was down there looking at the engine, I'd go ahead and just try and see if my impact wrench would budge the balancer bolt. Surprisingly the bolt came right off. The compressor wasn't even at full pressure. In fact, the compressor turned ON (around 60PSI) when the nut came free. So now I just need to get a cheap balancer puller. Once that's out of the way, I'll pull the lifters, rods, and cam.
One of the things I noticed looking at the underside of the engine, each piston is marked with a number. Some pistons have a 2 others have a 3. At the factory, do they bore the cylinders with an expected level of inaccuracy, and then fit the bore with a piston to fit and the numbers on the bottom side of the pistons indicate its size?
While looking at the cylinder walls, there's very little wear. I can still see the factory cross hatching quite clearly. Towards the bottom of the bore, you can see an oil film where the rings quit traveling. On the lateral sizes of the bore, that film isn't there, showing how the piston does experience side-loading on the up and down stroke thus rubbing the sidewall harder in those areas and preventing the oil film from building. Just seeing that makes me glad I stuck to my guns and am moving forward as a 331, not a 347 with a shorter rod-to-stroke ratio (RtSR). While the shorter RtSR isn't damning since quite a few engines (like the SBC 400) have right small RtSR numbers and have served people quite well over the years, I'm looking for max efficiency for a daily driver. So focusing on minimizing the side-loading friction in an effort to improve rotational efficiency is worth it I believe.
While I was looking around in there, I scratched the cylinder wall with my finger nail, and I couldn't feel any ledge or noticeable wear where the rings stop. Once the heads are off, I'll be able to check the tops. But this has me wondering if it is worth the money to bother having the cylinders bored and thus stick with 4.000" pistons. Thoughts?
...Always Somethin'
89 Ranger Supercab, 331, ported GT40p heads w/1.6RRs, Crane Powermax 2020 cam, ported Explorer lower, FMS Explorer (GT40p) headers, aftermarket T5 'Z-Spec', 8.8" rear w/3.27s, Powertrax Locker, A9L w/Moates QuarterHorse, Innovate LC-1, James Duff traction bars, iDelta DC Fan controller
Admin of EECtuning.org
-
Dave

- Supporting Member
- Posts: 1524
- Joined: Fri Dec 10, 2004 4:36 pm
- SM: No
- Location: Central Wisconsin
Re: And the 331 project finally begins...
Glad to see you keeping busy! Would hope the bores are good to go but no way of telling from here. It's at the top of the stroke where you will find the ridge indicating wear. I assume the block is going into a shop, just have them give you their honest opion on boring. You know you'd have to explain why you have a 327 ci in a Ford don't you?
I can't imagine Ford matching pistons to bores in todays age of machining accuracy. Wold think they could hit a plus/minus of .0005". Even everything down below is torqued by a machine now. How are the pistons marked, what with?
Dave - got more rain coming!
I can't imagine Ford matching pistons to bores in todays age of machining accuracy. Wold think they could hit a plus/minus of .0005". Even everything down below is torqued by a machine now. How are the pistons marked, what with?
Dave - got more rain coming!
'66'Ranchero 302/5 speed
2015 Stage 3 Roush - rated at 670 hp
2000 Ext Cab/4 door swap project
2000 Ext Cab/4 door, Summer beater
2000 Ext Cab/4 door, Winter beater
1969 Fairlane Cobra in Barn, just waiting
2015 Stage 3 Roush - rated at 670 hp
2000 Ext Cab/4 door swap project
2000 Ext Cab/4 door, Summer beater
2000 Ext Cab/4 door, Winter beater
1969 Fairlane Cobra in Barn, just waiting
-
MalcolmV8
- Supporting Member
- Posts: 2597
- Joined: Fri Dec 10, 2004 4:50 pm
- SM: Yes
- Location: Kansas City, MO
Re: And the 331 project finally begins...
You could have a machine shop measure the bores and tell you if you can just hone the cylinders and put stock sized piston/rings in there.
Honing will even take a small amount off. When the machine shop did the block in my cobra they kept that in consideration and bored the block and then honed to final spec. I know you're not nearly as concerned with that much accuracy so just see what the machine shop says.
I'd bore it and go for more cubes but then I'd probably also go for the 347 instead of the 331
92 302 Ranger - sold
94 302 Ranger AWD - sold
07 BMW 335xi - tuned, boost turned up, E85 - sold
04 911 TT - to many mods to list. Over 600 All Wheel HP on pump gas - sold
2015 Coyote - daily driver
03 Cobra - 2.3 TVS on a built 12:1 CR motor with ported heads, cams, long tubes etc.
MD Racing Lean Protection Module
E85
Tuned by MD Racing
https://www.youtube.com/c/MalcolmV8
94 302 Ranger AWD - sold
07 BMW 335xi - tuned, boost turned up, E85 - sold
04 911 TT - to many mods to list. Over 600 All Wheel HP on pump gas - sold
2015 Coyote - daily driver
03 Cobra - 2.3 TVS on a built 12:1 CR motor with ported heads, cams, long tubes etc.
MD Racing Lean Protection Module
E85
Tuned by MD Racing
https://www.youtube.com/c/MalcolmV8
-
cgrey8
- Supporting Member
- Posts: 4055
- Joined: Fri Dec 10, 2004 8:23 pm
- SM: No
- Location: Acworth, Ga (Metro Atlanta)
- Contact:
Re: And the 331 project finally begins...
It looks like some kind of stamp with ink that isn't dissolved by engine oil. It's not imprinting into the metal. I'll get a pic of it next time I'm down there.Dave wrote:...How are the pistons marked, what with?...
...Always Somethin'
89 Ranger Supercab, 331, ported GT40p heads w/1.6RRs, Crane Powermax 2020 cam, ported Explorer lower, FMS Explorer (GT40p) headers, aftermarket T5 'Z-Spec', 8.8" rear w/3.27s, Powertrax Locker, A9L w/Moates QuarterHorse, Innovate LC-1, James Duff traction bars, iDelta DC Fan controller
Admin of EECtuning.org
89 Ranger Supercab, 331, ported GT40p heads w/1.6RRs, Crane Powermax 2020 cam, ported Explorer lower, FMS Explorer (GT40p) headers, aftermarket T5 'Z-Spec', 8.8" rear w/3.27s, Powertrax Locker, A9L w/Moates QuarterHorse, Innovate LC-1, James Duff traction bars, iDelta DC Fan controller
Admin of EECtuning.org
-
cgrey8
- Supporting Member
- Posts: 4055
- Joined: Fri Dec 10, 2004 8:23 pm
- SM: No
- Location: Acworth, Ga (Metro Atlanta)
- Contact:
Re: And the 331 project finally begins...
Here's the marks I was referring to:
Any ideas as to what the significance of those stamps are?
...Always Somethin'
89 Ranger Supercab, 331, ported GT40p heads w/1.6RRs, Crane Powermax 2020 cam, ported Explorer lower, FMS Explorer (GT40p) headers, aftermarket T5 'Z-Spec', 8.8" rear w/3.27s, Powertrax Locker, A9L w/Moates QuarterHorse, Innovate LC-1, James Duff traction bars, iDelta DC Fan controller
Admin of EECtuning.org
89 Ranger Supercab, 331, ported GT40p heads w/1.6RRs, Crane Powermax 2020 cam, ported Explorer lower, FMS Explorer (GT40p) headers, aftermarket T5 'Z-Spec', 8.8" rear w/3.27s, Powertrax Locker, A9L w/Moates QuarterHorse, Innovate LC-1, James Duff traction bars, iDelta DC Fan controller
Admin of EECtuning.org
-
Dave
- Supporting Member
- Posts: 1524
- Joined: Fri Dec 10, 2004 4:36 pm
- SM: No
- Location: Central Wisconsin
Re: And the 331 project finally begins...
Sure don't look factory by any means. Have a feeling it's been bored already, that's why you found the bores looking so good. Got the heads off yet, they would be stamped with the over sized piston. Maybe the bores were just honed and the shop marked them to the bore.
Dave
Dave
'66'Ranchero 302/5 speed
2015 Stage 3 Roush - rated at 670 hp
2000 Ext Cab/4 door swap project
2000 Ext Cab/4 door, Summer beater
2000 Ext Cab/4 door, Winter beater
1969 Fairlane Cobra in Barn, just waiting
2015 Stage 3 Roush - rated at 670 hp
2000 Ext Cab/4 door swap project
2000 Ext Cab/4 door, Summer beater
2000 Ext Cab/4 door, Winter beater
1969 Fairlane Cobra in Barn, just waiting
-
cgrey8
- Supporting Member
- Posts: 4055
- Joined: Fri Dec 10, 2004 8:23 pm
- SM: No
- Location: Acworth, Ga (Metro Atlanta)
- Contact:
Re: And the 331 project finally begins...
The numbers aren't consistent with the cylinder number. All 8 pistons are marked with either a 2 or 3.
At the moment, I don't have the heads off. I did get the balancer pulled yesterday and the front timing cover off. I also got some pics of the Cam Sensor before I pulled it. I always wanted to know how those things worked as well as how to set them up correctly. So before I pulled it and thus jacked up the stock setting, I thought I'd investigate. Here's what I found:
EECTuning.org>Setting up an EDIS Cam Position Sensor
Next step is pulling all the rockers/pushrods/lifters. Once I get them out of the way, I'll be well on my way to getting the heads off. I'll be sure to get pics. What I don't have is a way to measure the cylinder wall diameter or deck height. I have a standard mic and a Vernier caliper. But I don't have an inside micrometer or a depth micrometer. I guess those'll be the next tools I'll be saving up for.
With the heads out of the way, the next step will be building some stands so I can begin the porting. Anybody I've ever talked to that does any amount of porting has home-made stands that they set the heads and/or intake in to hold the head at an angle while they are grinding away in the ports. It looks like it could be a back-breaking job. I also need to get some more stand stones and polishers to clean up the ports after I make the hard cuts. I'm not so worried about roughness in the intake port. Most people say you should leave them rough and only sand to get a specific shape that the metal-cutters would be too aggressive for. But since I don't yet have a sense of how fast those cutters can remove metal, I don't really have a frame of reference. I'll figure it out...
...Always Somethin'
89 Ranger Supercab, 331, ported GT40p heads w/1.6RRs, Crane Powermax 2020 cam, ported Explorer lower, FMS Explorer (GT40p) headers, aftermarket T5 'Z-Spec', 8.8" rear w/3.27s, Powertrax Locker, A9L w/Moates QuarterHorse, Innovate LC-1, James Duff traction bars, iDelta DC Fan controller
Admin of EECtuning.org
89 Ranger Supercab, 331, ported GT40p heads w/1.6RRs, Crane Powermax 2020 cam, ported Explorer lower, FMS Explorer (GT40p) headers, aftermarket T5 'Z-Spec', 8.8" rear w/3.27s, Powertrax Locker, A9L w/Moates QuarterHorse, Innovate LC-1, James Duff traction bars, iDelta DC Fan controller
Admin of EECtuning.org
-
Dave
- Supporting Member
- Posts: 1524
- Joined: Fri Dec 10, 2004 4:36 pm
- SM: No
- Location: Central Wisconsin
Re: And the 331 project finally begins...
Chris,
Knew I had pictures of what a virgin Explorer block looks like on the bottom side. All kinds of pretty paint marks. I believe that the machine that does all the proper torquing also squirts a little paint down there to mark that it's met spec. About the only Ford motor that gets special attention is the ones going into the Shelby 500, got a vidio of that somewhere also. As far as the cam sensor positioning, I was able to borrow the tool from the Ford dealer over a long weekend. Have since bought one, same with the fan removal wrenches.
Dave
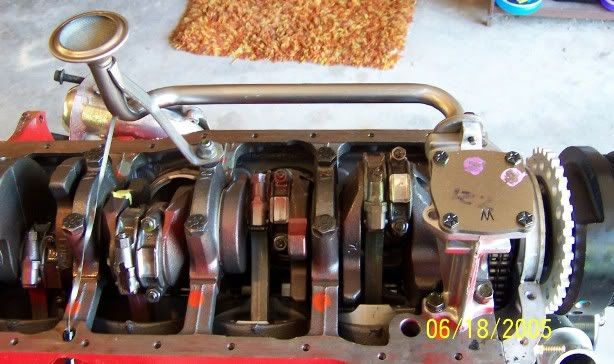
'66'Ranchero 302/5 speed
2015 Stage 3 Roush - rated at 670 hp
2000 Ext Cab/4 door swap project
2000 Ext Cab/4 door, Summer beater
2000 Ext Cab/4 door, Winter beater
1969 Fairlane Cobra in Barn, just waiting
2015 Stage 3 Roush - rated at 670 hp
2000 Ext Cab/4 door swap project
2000 Ext Cab/4 door, Summer beater
2000 Ext Cab/4 door, Winter beater
1969 Fairlane Cobra in Barn, just waiting
-
MalcolmV8
- Supporting Member
- Posts: 2597
- Joined: Fri Dec 10, 2004 4:50 pm
- SM: Yes
- Location: Kansas City, MO
Re: And the 331 project finally begins...
Those paint marks seem to be all over motors. My 03 Cobra motor was hand built and even it had a few on the outside. None inside the motor though that I can recall.
92 302 Ranger - sold
94 302 Ranger AWD - sold
07 BMW 335xi - tuned, boost turned up, E85 - sold
04 911 TT - to many mods to list. Over 600 All Wheel HP on pump gas - sold
2015 Coyote - daily driver
03 Cobra - 2.3 TVS on a built 12:1 CR motor with ported heads, cams, long tubes etc.
MD Racing Lean Protection Module
E85
Tuned by MD Racing
https://www.youtube.com/c/MalcolmV8
94 302 Ranger AWD - sold
07 BMW 335xi - tuned, boost turned up, E85 - sold
04 911 TT - to many mods to list. Over 600 All Wheel HP on pump gas - sold
2015 Coyote - daily driver
03 Cobra - 2.3 TVS on a built 12:1 CR motor with ported heads, cams, long tubes etc.
MD Racing Lean Protection Module
E85
Tuned by MD Racing
https://www.youtube.com/c/MalcolmV8
-
cgrey8
- Supporting Member
- Posts: 4055
- Joined: Fri Dec 10, 2004 8:23 pm
- SM: No
- Location: Acworth, Ga (Metro Atlanta)
- Contact:
Re: And the 331 project finally begins...
The question of the cam sensor, how it worked, and what kind of signal it sent to the EEC was a long-standing one I'd had and had been making bad assumptions about. I assumed these were married to the cylinder count like a distributor is and I was wrong. Now I see why. And seeing how it works, there's no need for the tool to time it. It can be eye-balled easy enough. The EEC only uses it for injector timing which isn't critical to get accurate. Being off by 20-30° will not be noticed. The important thing is that the fuel is getting delivered. When it gets delivered is an optimization that just needs to be close. After all batch fire injection has no timing. The injector fires completely asynchronous to the cylinder cycle.
...Always Somethin'
89 Ranger Supercab, 331, ported GT40p heads w/1.6RRs, Crane Powermax 2020 cam, ported Explorer lower, FMS Explorer (GT40p) headers, aftermarket T5 'Z-Spec', 8.8" rear w/3.27s, Powertrax Locker, A9L w/Moates QuarterHorse, Innovate LC-1, James Duff traction bars, iDelta DC Fan controller
Admin of EECtuning.org
89 Ranger Supercab, 331, ported GT40p heads w/1.6RRs, Crane Powermax 2020 cam, ported Explorer lower, FMS Explorer (GT40p) headers, aftermarket T5 'Z-Spec', 8.8" rear w/3.27s, Powertrax Locker, A9L w/Moates QuarterHorse, Innovate LC-1, James Duff traction bars, iDelta DC Fan controller
Admin of EECtuning.org
Re: And the 331 project finally begins...
the stands are a GREAT idea there ... i wish i had made me a set back when i worked in a speed shop and ported quite a few sets of heads .... but i didnt .... i just used a metal top bench and laid them flat on the intake and exhaust ports to do them .... they moved around a bit too.With the heads out of the way, the next step will be building some stands so I can begin the porting. Anybody I've ever talked to that does any amount of porting has home-made stands that they set the heads and/or intake in to hold the head at an angle while they are grinding away in the ports. It looks like it could be a back-breaking job. I also need to get some more stand stones and polishers to clean up the ports after I make the hard cuts. I'm not so worried about roughness in the intake port. Most people say you should leave them rough and only sand to get a specific shape that the metal-cutters would be too aggressive for. But since I don't yet have a sense of how fast those cutters can remove metal, I don't really have a frame of reference. I'll figure it out...
trust me it IS back breaking work to port and polish heads.. i have done MANY sets even 3 sets of my own...... and cast iron and aluminum ones too ... and it does take a LONG time to do them. Porting takes a LONG time so post one then port the other .... then go drink a 6 pack of beer and come back and polish one head then polish the other ...... some cutters cut better and way more faster then some of the cheaper cutters....so if you can afford the GOOD bit..... get them they will make ya job go a lot faster and smoother too ....and i can tell ya this ..... if you goin to factor in "time" to port and polish BOTH heads and do them right ....... expect to spend at least ......i dunno ........ well i spent about 16 hours on one set to port and polish then about 7 hours on the aluminum ones ........so some where between 8 and 24 hours for a beginner and a whole cooler full of beer. And remember this too ..... on a ford head .,..... it can be EASY to grind right into a water port inside the exhaust port too ..... trust me ... i did it to one set of mine... and there is no way to "properly" repair them and make them last. so take your time and pay attention to what you are doing and have at it and have fun with it. Wear eye safety too and on a another point .. wear a pair of those Mechanics gloves and a long sleeve shirt and duct tape the sleeves over the gloves and tuck in your shirt and put a bandanna around your neck and find a way to duct tape it too..... that should keep all the small little metal shavings out of your eyes and stuff.... they feel like 10,000 little needles poking in you when you move if you dont wear that stuff and tape them up like a Haz Mat suit. remember there are bits that are made to cut cast iron and ones to cut aluminum so use the right ones for the job ... if you use aluminum bits on cast iron they will not cut well and will cut to deep for the first few seconds then will stop cutting at all and if you use aluminum ones on cast iron they will clog up the bits so bad that the only way you can get the aluminum out is to heat it and melt it out with a cutting torch and that will ruin the bit...... there again .. trust me ... i did it .....but it was all i had at the time and did not work well so i stopped and ordered the right bits then the job went WAY better!! Good Luck and keep us posted and post some before and after pix too.... you can also polish the combustion chamber some too ...... not to much ..... just smooth them up a little bit. .... Peace
96 Ranger Extended cab - work in progress.. 5.0 out of a 90 Mustang GT..Tremec TKO-3550-2 with mid-shift conversion ..Explorer GT40 intake and fuel rails. X303 FMS cam . WP Jr alum heads . K&N air filter.lowered .Weld Drag Lites (or Weld Pro-Stars) .. a 8.8 with Auburn Pro ..Moser custom alloy street axles (31 spline) and a 3:73 gear.L&L engine mounts and oil filter adapter.Aluminum Rad from James Duff.
Peace from Oxford Miss.
Grumpy
Peace from Oxford Miss.
Grumpy
-
cgrey8
- Supporting Member
- Posts: 4055
- Joined: Fri Dec 10, 2004 8:23 pm
- SM: No
- Location: Acworth, Ga (Metro Atlanta)
- Contact:
Re: And the 331 project finally begins...
These are the porting bits I bought.

They were over $16/each. I consider that expensive, but not if they'll make my life easier. They are also 6" shanks which made them much more than their shorter cousins. To keep them stable, I'll pretty much have to use leather gloves and hold the spinning shank with the gloves while the bit cuts.
Thanks for the tip about the pieces going everywhere. I'm an avid safety glass user when it comes to grinding or cutting. But I didn't think about the sting of those filings in my clothes, around my neck, and under my gloves. I'll have to remember that.
And yes, I was expecting a good 2 hrs per port. The 1st few ports taking longer just because I'll be learning. But I'll have 7 more just like the 1st one to get better on. Interestingly the exhaust port of 1 cylinder per head is a little different since there's a hole for the EGR. I'm not sure how that hole will affect flow. Should I just pretend it isn't there? Or should I port the bowl differently knowing the hole is there?
...Always Somethin'
89 Ranger Supercab, 331, ported GT40p heads w/1.6RRs, Crane Powermax 2020 cam, ported Explorer lower, FMS Explorer (GT40p) headers, aftermarket T5 'Z-Spec', 8.8" rear w/3.27s, Powertrax Locker, A9L w/Moates QuarterHorse, Innovate LC-1, James Duff traction bars, iDelta DC Fan controller
Admin of EECtuning.org
89 Ranger Supercab, 331, ported GT40p heads w/1.6RRs, Crane Powermax 2020 cam, ported Explorer lower, FMS Explorer (GT40p) headers, aftermarket T5 'Z-Spec', 8.8" rear w/3.27s, Powertrax Locker, A9L w/Moates QuarterHorse, Innovate LC-1, James Duff traction bars, iDelta DC Fan controller
Admin of EECtuning.org
-
cgrey8
- Supporting Member
- Posts: 4055
- Joined: Fri Dec 10, 2004 8:23 pm
- SM: No
- Location: Acworth, Ga (Metro Atlanta)
- Contact:
Re: And the 331 project finally begins...
Its been hot as can be for the past few weeks so I haven't been doing much because of that. But tonight, it got cool enough for me to get back into the garage and do some more work. I got the rockers, pushrods, dog-bones, spider, cam, and heads off. The lifters were a LOT heavier than I thought they'd be. Also most of them had some kind of a mark banged into them, and that mark was up (towards the valley) on almost all of them. But there were 2 or 3 lifters where that mark was down (closer to the pistons). Is there an orientation to Ford stock Roller Lifters? And is there a difference between Intake and Exhaust lifters? I didn't see any differences or distinguishing marks that made one obviously different than the other. But I thought I'd ask just to be sure.
I couldn't believe how black and caked the heads were. I'm not sure if that was from oil from sitting or if the engine was just running that badly before the engine was pulled. I also noticed that even with the loose carbon knocked off with a wire brush, there was carbon build-up that stayed fixed to the piston. Even carb cleaner didn't get it off. I'd have to scratch at it with a brillo pad or something more abrasive. Since I'm not reusing the pistons, I don't really care. But it does make me wonder if there's some benefit in putting a piston top coating on the replacement pistons to help reduce carbon build-up. Being this will be a fairly high compression engine for iron heads, I'd think that carbon buildup like that would not be a good thing for keeping detonation down. Thoughts?
Hopefully later this weekend, I'll have the crank and pistons out as well.
I also need to build some kind of rig to hold the heads while I go grinding on them. I'm just trying to determine how much effort I should put into a holder. Another thing I need is a stool. From what I understand, you spend a good 1-2 hrs per port. That's too long to be standing in the same place. Expert porters can generally get a pair of V8 heads ported in about 16hrs, but being this'll be my 1st time doing it, I fully expect it to take longer. And then I got the intake to do after that.
I did get out my dial indicator and determined that most of the cylinders are in the hole .015-.017" at their TDC. One thing I noticed is the pistons are fairly heavily chamfered on the edges with a 45° edge. Are all aftermarket pistons as heavily chamfered as a stock piston? Or do most aftermarket pistons have sharper edges?
At this point, is there anybody that would like to see any pics? If so, of what? Nothing is particularly interesting...just rusty heads and cruddy decks. The walls do look nice with next to no lip. I can feel an edge, but it is not a sharp edge that my finger nail can catch. The walls still show the cross hatching. One cylinder obviously held some water for a while. I can see that cylinder's wall has a water mark where the water sat and surface-rusted it. The rust knocked right off and the surface is smooth, but I can still see the mark. I expect the .030" overbore will remove all that.
...Always Somethin'
89 Ranger Supercab, 331, ported GT40p heads w/1.6RRs, Crane Powermax 2020 cam, ported Explorer lower, FMS Explorer (GT40p) headers, aftermarket T5 'Z-Spec', 8.8" rear w/3.27s, Powertrax Locker, A9L w/Moates QuarterHorse, Innovate LC-1, James Duff traction bars, iDelta DC Fan controller
Admin of EECtuning.org
89 Ranger Supercab, 331, ported GT40p heads w/1.6RRs, Crane Powermax 2020 cam, ported Explorer lower, FMS Explorer (GT40p) headers, aftermarket T5 'Z-Spec', 8.8" rear w/3.27s, Powertrax Locker, A9L w/Moates QuarterHorse, Innovate LC-1, James Duff traction bars, iDelta DC Fan controller
Admin of EECtuning.org
-
Warpig Racing

- Posts: 488
- Joined: Sun Nov 20, 2005 2:34 pm
- SM: No
- Contact:
Re: And the 331 project finally begins...
please fill me in why the explorer block is better. There is a pull apart salvage near my house where all long blocks are $125 and complete engines including brackets, intake, distributor, etc is $250. Should i be checking thee out for possible resale?
I usually go over there and get 9" lockers for $50 and resell them on ebay for $200+
I usually go over there and get 9" lockers for $50 and resell them on ebay for $200+
Will
88 extended cab w/ 347, C6 w/ 3100 stall, Narrow 9" w/ 28x14.50 Quick Time Pros.
http://s118.photobucket.com/albums/o117/imabass/Ranger
09 Honda chopper http://s118.photobucket.com/albums/o117/imabass/CB750/
99 Ram
05 Toyota Camry (4 banger)
88 extended cab w/ 347, C6 w/ 3100 stall, Narrow 9" w/ 28x14.50 Quick Time Pros.
http://s118.photobucket.com/albums/o117/imabass/Ranger
09 Honda chopper http://s118.photobucket.com/albums/o117/imabass/CB750/
99 Ram
05 Toyota Camry (4 banger)